Configure Exchange 2019 for anonymous SMTP relay

This article provides guidance for configuring Exchange Server 2019 as an anonymous relay. We document how to configure Exchange Server 2019 as an anonymous relay within your own network. To achieve this, we use your internal network ranges to limit who can relay emails.
What the anonymous relay does
Anonymous relaying is a common requirement for those wishing to allow services or applications to send emails. Examples include multifunction devices such as printers and software applications. Organizations using hybrid deployments can also benefit from the ability to anonymously relay emails. This is achieved by using Exchange 2019 servers instead of a generic SMTP server. Microsoft’s documented prerequisites for Exchange hybrid deployments include support for Exchange Server 2019. This further strengthens the case for using Exchange 2019 servers.
Test framework
The Exchange 2019 lab includes a domain controller, an Exchange 2019 server, and a Windows 10 client machine. These scenarios are NOT intended to be connected to the internet, but to replicate the steps outlined in this article.
The configuration

Our laboratory contains three machines:
| Nom | Role | IP Address |
| Lab2019DC1 | Windows Server 2019 Domain Controller | 192.168.12.3 |
| LAB2019EX1 | Exchange Server 2019 on Windows Server 2019 | 192.168.12.4 |
| LAB2019Client | Windows 10 Domain joined client | 192.168.12.5 |
Internal relay or open relay?
An internal relay is an SMTP server that relays emails from an internal source to a destination. This destination can be your on-premises Exchange organization, an Office 365 tenant, or external email domains.
An open relay is a misconfigured mail server that allows connections from any domain. Open relays tend to be found by spammers. They take control of the system to send large amounts of email and end up being blacklisted.
SMTP traffic management
When we configure an anonymous relay, we need to know where the SMTP requests are coming from for one of two reasons:
- Because we have designated subnets of authorized services, such as servers, printers, applications, etc.
- Because we know the individual IP addresses of the machines that require SMTP relay.
It’s obviously easier to work with clearly defined subnets. But we can also use a list of IP addresses. We’ll cover both scenarios later.
Namespace
Les espaces de noms vous permettent d’assurer l’avenir d’un service et de le faire évoluer ultérieurement. Namespaces allow you to future-proof a service and scale it up later. We can design an SMTP namespace called relay.company.com as a load-balanced namespace, using:
- either a DNS alias,
- or a load balancer.
We can also add a geographic component. Let’s use relay-sea.company.com or relay-lhr.company.com, in this case with the airport codes for Seattle and London Heathrow.
Why bother creating a namespace if we only have one machine? This way, the service we create is independent of the machine name.
Consider a branch office scenario in Seattle with an Exchange 2013 server that needs to be upgraded to Exchange 2019. If our printers and applications were configured to use EXSEA2013 as an SMTP relay, as opposed to SMTPSEA.company.com, we would need to reconfigure many of the points that were configured to point to a server, as opposed to swapping the old server for a new one behind a namespace.
In our lab, we first create a CNAME record: mail.practical365lab.com pointing to our Exchange 2019 server, LAB2019EX1 (Figure 1), using the DNS console on Lab2019DC1:

Exchange 2019
The Exchange Server 2019 architecture deploys Exchange servers as a single building block, containing front-end and back-end roles. The Front End Transport and Transport services are co-located on the same server. When you install a new Exchange 2019 server, several Receive connectors are created. This includes the Default Receive connector to allow Exchange to receive emails from the internet. We’ll briefly examine the details of the Default Receive connectors. Then, we’ll ignore them when we create a dedicated Anonymous Relay connector.
Let’s start by examining the default connectors on our Exchange 2019 server (LAB2019EX1) via PowerShell and the Exchange Admin GUI.
Get-ReceiveConnector

[PS] C:\>Get-ReceiveConnector

Identity                                      Bindings                  Enabled
--------                                      --------                  -------
LAB2019EX1\Default LAB2019EX1                 {0.0.0.0:2525, [::]:2525} True
LAB2019EX1\Client Proxy LAB2019EX1            {[::]:465, 0.0.0.0:465}   True
LAB2019EX1\Default Frontend LAB2019EX1        {[::]:25, 0.0.0.0:25}     True
LAB2019EX1\Outbound Proxy Frontend LAB2019EX1 {[::]:717, 0.0.0.0:717}   True
LAB2019EX1\Client Frontend LAB2019EX1         {[::]:587, 0.0.0.0:587}   True


[PS] C:\>
In the Exchange Admin Center, navigate to Mail Flow and then to Receive Connectors. Select the server on which you want to view Receive Connectors:

Dedicated receive connector
We’ll create a dedicated Receive connector for anonymous relaying from specific internal IP addresses. This is a better idea than modifying the default Receive connector configured to receive emails from the Internet. Keeping the default Receive connectors helps prevent servers from becoming open relays.
In our lab, our internal address range is 192.168.12.0/24. But we don’t want to configure our connector to accept connections from the entire subnet. For the purposes of this article, we’ll assume AB2019Client with the IP address 192.168.12.5 is our application server/multifunction printer. For the purposes of this demonstration, we’ll assume the 192.168.20.0/24 range is configured for printers requiring SMTP relay services. We configure our connector accordingly. This allows us to demonstrate adding selected IP addresses as well as entire subnets to secure our connector.
Run the following PowerShell command to create and configure the connector:
#Create a new Front End receive connector called "P365 Anonymous Relay"
New-ReceiveConnector -Name "P365 Anonymous Relay" `
-TransportRole FrontendTransport -Custom -Bindings 0.0.0.0:25 `
-RemoteIpRanges 192.168.12.5, 192.168.20.0/24

#Configure "P365 Anonymous Relay" to be used anonymously
Set-ReceiveConnector "P365 Anonymous Relay" -PermissionGroups AnonymousUsers
Get-ReceiveConnector "P365 Anonymous Relay" | Add-ADPermission -User "NT AUTHORITY\ANONYMOUS LOGON" `
-ExtendedRights "Ms-Exch-SMTP-Accept-Any-Recipient"

#Configure "P365 Anonymous Relay" as externally secured
Set-ReceiveConnector "P365 Anonymous Relay" -AuthMechanism ExternalAuthoritative `
-PermissionGroups ExchangeServers
Here is the PowerShell output for the above commands:
[PS] C:\>#Create a new Front End receive connector called "P365 Anonymous Relay"
[PS] C:\>New-ReceiveConnector -Name "P365 Anonymous Relay" `
>> -TransportRole FrontendTransport -Custom -Bindings 0.0.0.0:25 `
>> -RemoteIpRanges 192.168.12.5, 192.168.20.0/24

Identity                        Bindings     Enabled
--------                        --------     -------
LAB2019EX1\P365 Anonymous Relay {0.0.0.0:25} True


[PS] C:\>
[PS] C:\>#Configure "P365 Anonymous Relay" to be used anonymously
[PS] C:\>Set-ReceiveConnector "P365 Anonymous Relay" -PermissionGroups AnonymousUsers
[PS] C:\>Get-ReceiveConnector "P365 Anonymous Relay" | Add-ADPermission -User "NT AUTHORITY\ANONYMOUS LOGON" `
>> -ExtendedRights "Ms-Exch-SMTP-Accept-Any-Recipient"

Identity             User                 Deny  Inherited
--------             ----                 ----  ---------
LAB2019EX1\P365 A... NT AUTHORITY\ANON... False False


[PS] C:\>
[PS] C:\>#Configure "P365 Anonymous Relay" as externally secured
[PS] C:\>Set-ReceiveConnector "P365 Anonymous Relay" -AuthMechanism ExternalAuthoritative `
>> -PermissionGroups ExchangeServers
[PS] C:\>
We can access the connector through Exchange Administration, by navigating to Email Flow and then to Receive Connectors:

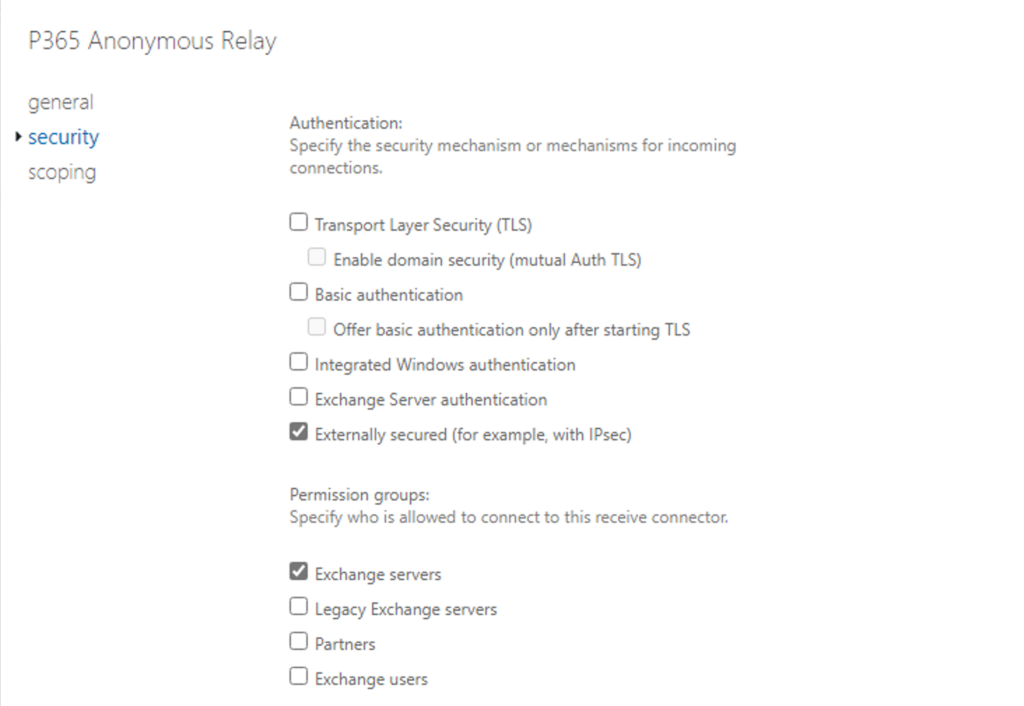
Double-click on the new connector, click on security to validate and then on scoping to view the security:
And the network settings:

How do we know it worked?
Below we see a test of our Lab2019Client application server using Send-MailMessage to test our connector from the LAB2019Client machine. Before creating the connector, we were unable to relay emails anonymously, after creating the connector, the test succeeds.
Testing using PowerShell
Figure 6 below shows the result of our tests using the PowerShell Send-MailMessage cmdlet:
Send-MailMessage -SmtpServer mail.practical365lab.com `
-From ‘administrator@practical365lab.com’ -To ‘nicolasblank@gmail.com’ ‘
-Subject ‘Test Email’ -Port 25
Testing using Telnet
Testing using Telnet – before configuring the Receive connector shown below in Figure 7. We expect our telnet test attempting to relay mail through the Exchange 2019 server to fail, which it does.

Testing using Telnet – after configuring the Receive connector shown below in Figure 8. This test completes successfully with the mail message received by Exchange 2019 and queued for delivery.

Ongoing maintenance
Since we’ve created a DNS alias for mail.practical365lab.com, we can replace the Exchange server with a newer version at any time. Or, we can configure multiple Exchange servers behind a virtual IP address hosted by a load balancer.
Because we used PowerShell to create the connector, we are able to replicate the creation logic across as many servers as needed.